OS Lab5流程

Connor

本文主要介绍 MOS Lab5 中文件系统的实现流程

如何从用户态磁盘读写出发,逐步实现一个支持文件创建、打开、读写、关闭和删除的文件系统。

全文主要包括以下内容:

  1. 实现 sys_read_devsys_write_dev,支持用户态访问 IDE 设备寄存器。
  2. 封装 ide_readide_write,完成基于 LBA 模式的磁盘扇区读写。
  3. 使用 fsformat 工具,将宿主机文件和目录写入磁盘镜像 fs.img
  4. 解释 struct File、直接索引和间接索引如何组织普通文件与目录。
  5. 实现块缓存机制,将磁盘块映射到用户态虚拟地址空间中。
  6. 通过 bitmap 管理磁盘块的分配与释放。
  7. 实现文件块映射、目录查找和路径解析。
  8. 实现文件的创建、打开、关闭、截断、删除和刷新。
  9. 说明文件系统服务进程如何通过 IPC 为普通用户进程提供文件操作接口。

整体来看,本文的主线是:

1
2
3
4
5
6
7
8
9
10
11
设备寄存器读写  

IDE 磁盘扇区读写

磁盘镜像构造

磁盘块缓存与分配

文件和目录管理

用户态文件系统服务

此外本文中对于具体函数实现等部分说的有点多,在看的时候可以先忽略这个具体的函数的细节,重点先把握主体的脉络,理解总体的目的和流程,等到最后再具体深入到函数的具体实现,可能这样会舒服很多。 。 。 然后文章中对于 Makefile 和 fsformat 的描述有点过用,但是其实这个东西和操作系统本身关系不大,主要用于对于创建这个 mos 时候将测试用的文件写进去以及对于有关进程的创建(本文其实并没有过多涉及),方便评测使用,稍微了解即可QAQ。

实现在用户态对磁盘进行读写

首先,在用户态实现两个系统调用: kern/syscall_all.c 中的 sys_write_dev , sys_read_dev

int sys_read_dev(u_int va, u_int pa, u_int len) 将位于物理地址位 pa 的 IDE 中的长度为 len 的数据读入虚拟地址 va 处, int sys_write_dev(u_int va, u_int pa, u_int len) 将位于虚拟地址 va 处的数据物理写入地址位 pa 的 IDE 中的长度为 len 的数据。

pa 是设备寄存器的物理地址,也就是 MMIO/I/O 寄存器地址。sys_read_dev/sys_write_dev 不是直接读写磁盘扇区,而是读写设备寄存器。IDE 扇区读写是通过多次访问这些寄存器间接完成的。

1
2
3
4
5
6
7
8
9
10
11
12
13
14
15
16
17
18
19
20
21
22
23
24
25
26
27
28
29
30
31
32
33
34
35
36
37
38
39
int sys_write_dev(u_int va, u_int pa, u_int len) {
if(len != 1 && len != 2 && len != 4) return -E_INVAL;
if(is_illegal_va_range(va, len)) return -E_INVAL;
if(!dev_range_is_valid(pa, len)) return -E_INVAL;

switch (len)
{
case 1:
iowrite8(*(uint8_t *)va, pa);
break;
case 2:
iowrite16(*(uint16_t *)va, pa);
break;
case 4:
iowrite32(*(uint32_t *)va, pa);
break;
}
return 0;
}

int sys_read_dev(u_int va, u_int pa, u_int len) {
if (len != 1 && len != 2 && len != 4) return -E_INVAL;
if (is_illegal_va_range(va, len)) return -E_INVAL;
if (!dev_range_is_valid(pa, len)) return -E_INVAL;

switch (len)
{
case 1:
*(uint8_t *)va = ioread8(pa);
break;
case 2:
*(uint16_t *)va = ioread16(pa);
break;
case 4:
*(uint32_t *)va = ioread32(pa);
break;
}
return 0;
}

这里的 iowriteioread 位于文件 include/io.h ,通过直接对 pa | KSEG1 位置进行读取数据来实现。

在实现了这个基本的从外界硬件读取数据的函数之后,就可以进一步封装成对 IDE 进行读取的函数:

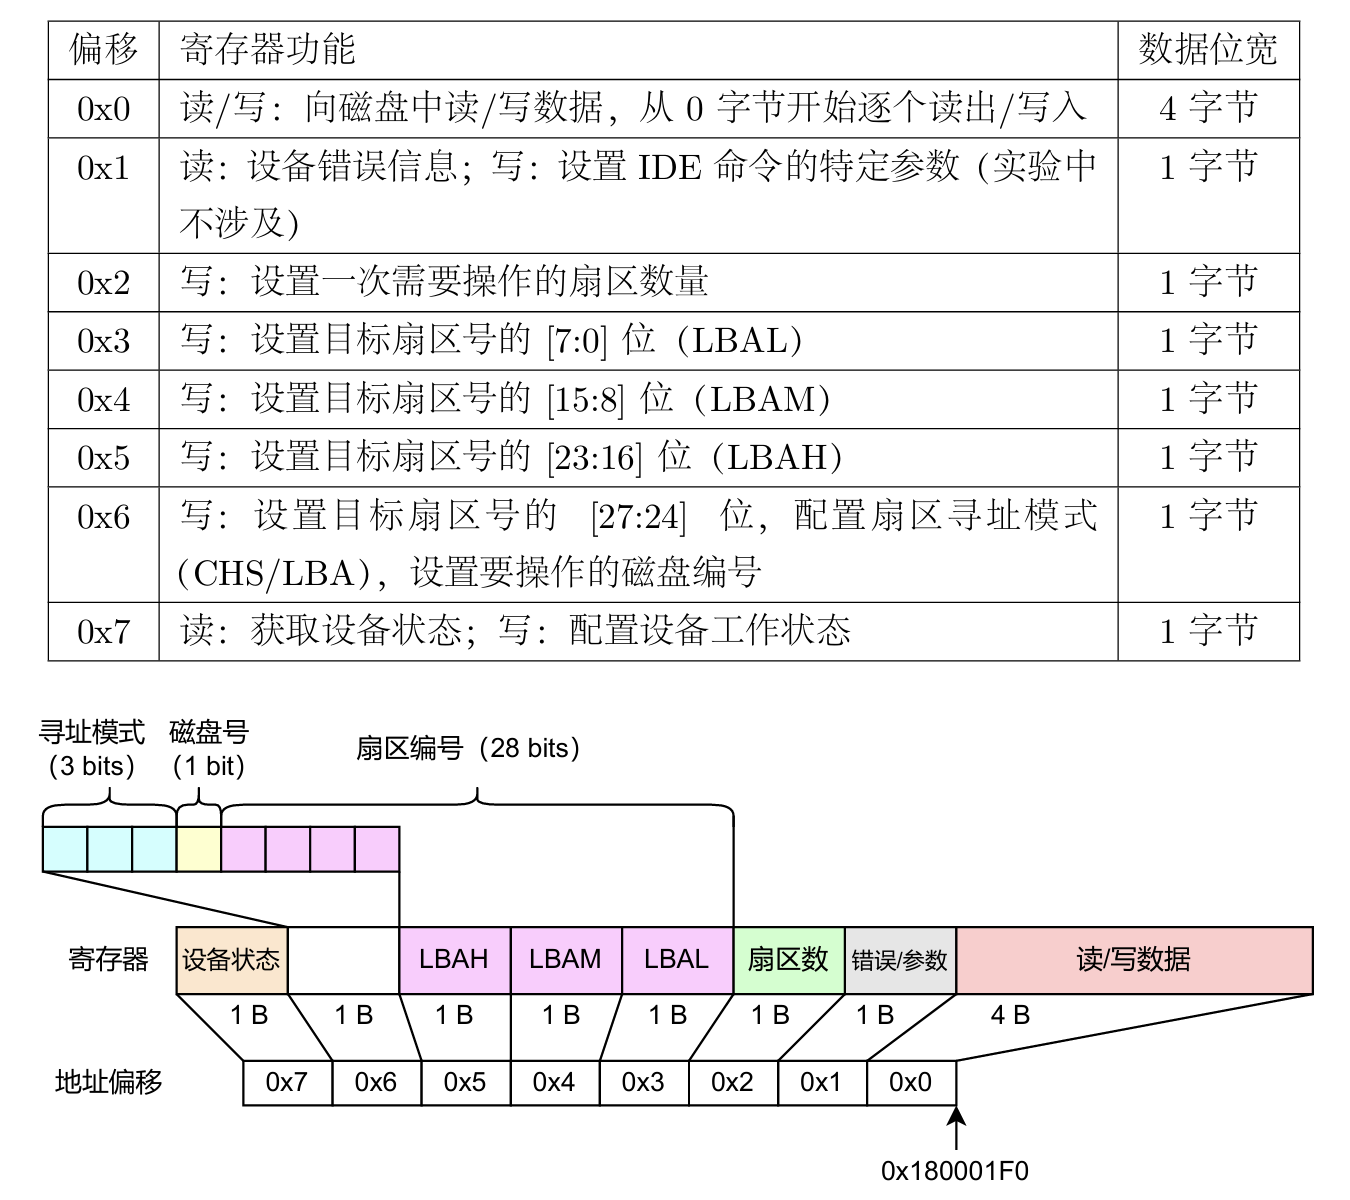
很显然,我们刚才实现的对外界硬件数据的读写是很笼统的,如果我们想要实现对于磁盘的读取,必须知道:从哪个磁盘读取/写入、从这个磁盘的哪个扇区读取/写入、读取/写入到什么位置、每次读取/写入多少个字节,这些信息。这就需要我们对 sys_read_devsys_write_dev 进行进一步的封装:

image1.png

如图,在 LBA 模式下,IDE 设备不再使用传统的“柱面 / 磁头 / 扇区”方式寻址,而是把整个磁盘抽象成一个连续的扇区数组:

1
sector 0, sector 1, sector 2, sector 3, ...

每个扇区都有一个唯一的逻辑编号,也就是 secno。如果要读写某个扇区,CPU 需要先把这个扇区编号按照 IDE 协议拆分后写入几个 LBA 相关寄存器中:

1
LBA[7:0]    -> LBA LowLBA[15:8]   -> LBA MidLBA[23:16]  -> LBA HighLBA[27:24]  -> Device 寄存器低 4 位

同时,CPU 还需要写入扇区数量寄存器,告诉 IDE 这次要操作几个扇区;写入 Device 寄存器,告诉 IDE 使用 LBA 模式并选择目标磁盘;最后向 Command 寄存器写入读或写命令。

因此,IDE 一次读写操作可以理解为:

1
设置目标磁盘和扇区号→ 设置读写扇区数量→ 发送读/写命令→ 通过 DATA 寄存器传输数据

需要注意的是,0x180001F0 对应的是 IDE 的 DATA 数据寄存器。CPU 最终确实是通过这个固定地址读出或写入数据的,但这个地址本身并不决定访问磁盘的哪个位置。真正决定磁盘位置的是前面写入的 LBA 寄存器、扇区数量寄存器和命令寄存器。

也就是说,DATA 寄存器更像是一个统一的数据窗口:

1
LBA 寄存器决定“读写磁盘哪里” Command 寄存器决定“执行读还是写” DATA 寄存器负责“数据从这里进出”

所以,当 CPU 从 0x180001F0 读取数据时,IDE 控制器会根据之前设置好的 LBA 地址和读命令,把对应扇区的数据送到这个数据寄存器中;当 CPU 向 0x180001F0 写入数据时,IDE 控制器也会根据之前设置好的 LBA 地址和写命令,把这些数据写入指定的磁盘扇区。

所以我们这里就要对刚才实现的 sys_write_devsys_read_dev 这两个函数进行进一步的封装:需要在读写之前对磁盘的 LBA 寄存器按照标准写入,很显然这里就可以通过我们刚刚实现的 sys_write_dev 来实现,因为我们是知道这个 LBA寄存器中每一个的物理地址(如图),在写完了这些数据之后通过我们刚才实现的函数来对 DATA 寄存器进行读写数据,就可以通过之前说的那样,经过 IDE 的协助帮你成功的获得你需要的磁盘中你需要的磁盘块的数据。

1
2
3
4
5
6
7
8
9
10
11
12
13
14
15
16
17
18
19
20
21
22
23
24
25
26
27
28
29
30
31
32
33
34
35
36
37
38
39
40
 void ide_read(u_int diskno, u_int secno, void *dst, u_int nsecs)
{
uint8_t temp;
u_int offset = 0, max = nsecs + secno;
panic_on(diskno >= 2);
// Read the sector in turn
while (secno < max)
{
temp = wait_ide_ready();
// Step 1: Write the number of operating sectors to NSECT register
temp = 1;
panic_on(syscall_write_dev(&temp, MALTA_IDE_NSECT, 1));
// Step 2: Write the 7:0 bits of sector number to LBAL register
temp = secno & 0xff;
panic_on(syscall_write_dev(&temp, MALTA_IDE_LBAL, 1));
// Step 3: Write the 15:8 bits of sector number to LBAM register
temp = (secno >> 8) & 0xff;
panic_on(syscall_write_dev(&temp, MALTA_IDE_LBAM, 1));
// Step 4: Write the 23:16 bits of sector number to LBAH register
temp = (secno >> 16) & 0xff;
panic_on(syscall_write_dev(&temp, MALTA_IDE_LBAH, 1));
// Step 5: Write the 27:24 bits of sector number, addressing mode and diskno to DEVICE register
temp = ((secno >> 24) & 0x0f) | MALTA_IDE_LBA | (diskno << 4);
panic_on(syscall_write_dev(&temp, MALTA_IDE_DEVICE, 1));
// Step 6: Write the working mode to STATUS register
temp = MALTA_IDE_CMD_PIO_READ;
panic_on(syscall_write_dev(&temp, MALTA_IDE_STATUS, 1));
// Step 7: Wait until the IDE is ready
temp = wait_ide_ready();
// Step 8: Read the data from device
for (int i = 0; i < SECT_SIZE / 4; i++)
{
panic_on(syscall_read_dev(dst + offset + i * 4, MALTA_IDE_DATA, 4));
}
// Step 9: Check IDE status
panic_on(syscall_read_dev(&temp, MALTA_IDE_STATUS, 1));
offset += SECT_SIZE;
secno += 1;
}
}

ide_write 同理。

现在我们就实现了在用户态对磁盘设备的读写操作。

离线构造阶段:fsformat

如何实现将我们现在的文件写入磁盘镜像

tools/fsformat.c 是用于创建符合我们定义的文件系统镜像的工具,可以将多个文件按照内核所定义的文件系统写入到磁盘镜像中。

后面这一段是对整体如何通过Makefile实现将这个文件写入的说明,你会花费一段时间看完,然后分数将会增长0分!

这里的意思是,当我们要运行代码的时候,比如我们运行 make test lab=5_3 && make run 的时候,在 tests/lab5_2 这个文件夹下会有以下文件:

  1. rootfs 这个文件夹,这个文件夹中存储着提前准备好的文件,也就是我们需要将他编译进入磁盘镜像中的文件;

  2. kernel.mk 中设置了 fs-filesinit-env

1
2
3
# kernel.mk
init-envs += fs_check
fs-files  += $(wildcard $(test_dir)/rootfs/*)

先说这个 fs-files 的用处,在定义了这个 Makefile 变量之后,会在顶层的 Makefile中有 :

1
2
fs-image: $(target_dir) user
    $(MAKE) --directory=fs image fs-files="$(addprefix ../, $(fs-files))"

这里面,image 是 make 的目标产物,依赖是这个tests目录下的rootfs这个目录文件,然后运行这个makefile的环境是在fs这个文件夹之下。在fs文件夹中的Makefile中 :

1
2
3
4
5
6
image: $(tools_dir)/fsformat
dd if=/dev/zero of=../target/fs.img bs=4096 count=1024 2>/dev/null
dd if=/dev/zero of=../target/empty.img bs=4096 count=1024 2>/dev/null
# using awk to remove paths with identical basename from FSIMGFILES
$(tools_dir)/fsformat ../target/fs.img \
$$(printf '%s\n' $(FSIMGFILES) | awk -F/ '{ ns[$$NF]=$$0 } END { for (n in ns) { print ns[n] } }')

先生成两个磁盘镜像:fs.imgempty.img ,之后,再通过我们写的 tools 下的 fsformat 这个工具将我们的rootfs这个文件夹下面的文件写入磁盘镜像中。
这个 init-envs 的作用在后面再细说。

  1. fs_check.cMakefile :这两个文件,前面是用于测试的代码,后面的Makefile则主要是实现对这个测试代码编译进入MOS,方便测试。

fsformat 是如何实现将文件写入磁盘镜像中的功能

先说磁盘块 Block :对于一个磁盘的空间,我们将他分成了许多个大小相同的磁盘块(block),在这个实验中,每一个block的大小和一个页一样大,为4096个字节。控制这个磁盘块的结构体如下所示,disk[i] 表示第 i 个磁盘块,一共有 NBLOCK个磁盘块,每一个磁盘块都有自己的 type(类型)和 data 。

1
2
3
4
5
struct Block
{
    uint8_t data[BLOCK_SIZE];
    uint32_t type;
} disk[NBLOCK];

在所有的这些磁盘块中,一般来说,第0个磁盘块是引导扇区和分区表 ,第1个磁盘块是超级块,后面还有位图表示磁盘的占用情况,再往后就是存放数据的数据块

再介绍一个基本的结构体: struct File

1
2
3
4
5
6
7
8
9
10
struct File {
char f_name[MAXNAMELEN]; // filename
uint32_t f_size; // file size in bytes
uint32_t f_type; // file type
uint32_t f_direct[NDIRECT];
uint32_t f_indirect;

struct File *f_dir; // the pointer to the dir where this file is in, valid only in memory.
char f_pad[FILE_STRUCT_SIZE - MAXNAMELEN - (3 + NDIRECT) * 4 - sizeof(void *)];
} __attribute__((aligned(4), packed));

所有的文件/目录都用这样的 struct File * 这样的一个文件控制块进行具体描述。在这个结构体中,f_name 是文件/目录的名字,f_size 是文件/目录的大小,f_type 是文件的类型:用来区分文件 (Regular file)目录(Directory)
f_directf_indirect 是文件/目录的具体内容在磁盘的存储位置。其中,f_direct 用来直接存储,f_indirect 用来间接存储,这两个存储的内容会根据文件的类型不一样而发生变化:

  1. 如果文件的类型是文件(Regular_file) :则这里面每一个 f_direct[i] 里面存储的内容是这个文件中的部分内容存储到的磁盘中的磁盘块的编号。超过直接索引的上限的则通过间接索引找到: f_indirect 这个指针指向一个磁盘块,这个磁盘块中存储了磁盘中用来存储文件内容的磁盘块的编号
  2. 如果文件的类型为目录(Direction): 则这里面的每一个 f_direct[i] 里面存储的内容是存储了这个子文件的文件控制块的磁盘块的编号,这个磁盘块里面连续存放多个子文件/子目录的 struct File,而间接指针存储的就是一个存储了这个子文件的文件控制块的磁盘块的编号的磁盘块的编号;

这里的文字表述可能有点抽象,可以看下面的uml图来理解一下 :
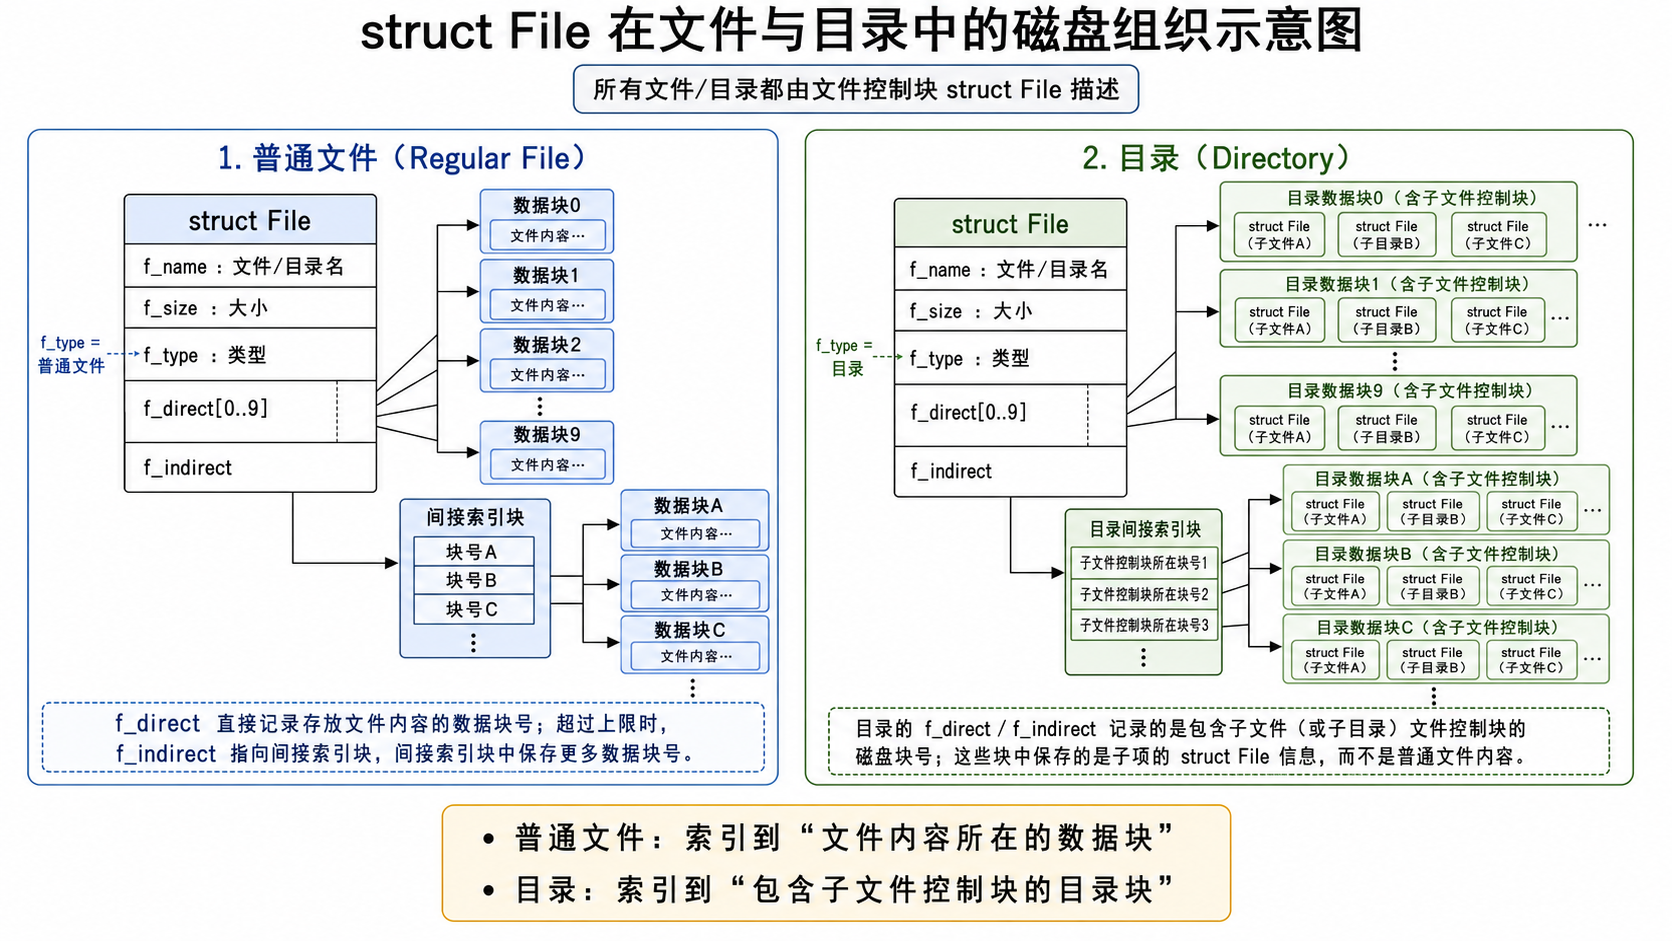
image2.png

说完这两个结构体就可以具体说说这个 fsformat 是如何实现的了z,我们可以直接从他的 main 函数开始看 :

1
2
3
4
5
6
7
8
9
10
11
12
13
14
15
16
17
18
19
20
21
22
23
24
25
26
27
28
29
30
31
32
33
34
35
int main(int argc, char **argv)
{
static_assert(sizeof(struct File) == FILE_STRUCT_SIZE);
init_disk();
if (argc < 3)
{
fprintf(stderr, "Usage: fsformat <img-file> [files or directories]...\n");
exit(1);
}
for (int i = 2; i < argc; i++)
{
char *name = argv[i];
struct stat stat_buf;
int r = stat(name, &stat_buf);
assert(r == 0);
if (S_ISDIR(stat_buf.st_mode))
{
printf("writing directory '%s' recursively into disk\n", name);
write_directory(&super.s_root, name);
}
else if (S_ISREG(stat_buf.st_mode))
{
printf("writing regular file '%s' into disk\n", name);
write_file(&super.s_root, name);
}
else
{
fprintf(stderr, "'%s' has illegal file mode %o\n", name, stat_buf.st_mode);
exit(2);
}
}
flush_bitmap();
finish_fs(argv[1]);
return 0;
}

首先进行一步 init_disk ,将磁盘镜像中的将所有的块都标为空闲块。这里的磁盘就是要对我们上面的 disk[] 这个数组中的内容进行处理。在具体实现的过程中,根据一共有的磁盘块的数量,为每一个磁盘块分配一个bit用来存储这个磁盘的状态,1表示空闲,0表示被占用,这里分配的这些bit也需要占用空间,这里占用的磁盘块就被标记为位图。这里要注意一点 :

如果位图还有剩余,不能将最后一块位图块中靠后的一部分内容标记为空闲,因为这些位所对应的磁盘块并不存在,是不可使用的。因此,将所有的位图块的每一位都置为 1 之后,还需要根据实际情况,将位图不存在的部分设为 0。

这里要求 argc 至少大于等于3,也就是至少需要传入两个参数,argv[1] 是磁盘的镜像文件,argv[2 ……] 是需要写入磁盘的文件/目录名。对于每一个要写入磁盘镜像的文件,会根据这个文件的类型选择 write_directory 或者 write_file 两个函数进行处理。

通过 flush_bitmap 函数对于写入文件之后的磁盘中的位图进行重新标记,在进行文件写入的过程中会维护 nextbno 这个变量的值为已使用的磁盘块的数量,通过将位图的对应 bit 置为0来表示这个磁盘块已经被占用;

finish_fs 函数把内存里的 disk[] 写到镜像文件。所谓的磁盘镜像本质上就是一个文件,所以给定的 argv[1] 就是这个磁盘镜像的文件名,这里可以直接使用 C 标准库中 open 函数打开这个文件,然后通过 write 将我们的 disk[i].data 写入这个文件,这一步就完成了。

下面再具体说说这个 write_directorywrite_file 是如何实现的,这两个函数分别实现将目录 、文件中的具体内容写入磁盘块中。想要实现将当前文件写入磁盘镜像中,首先,我们得为这个文件先分配一个 struct File 结构体用来管理这个文件,

从最开始的函数看起,next_block 函数实现了取出下一个空闲的磁盘块,并将磁盘块的类型设置为 type ,前面提到,在 flush_bitmap 这个函数中,我们需要使用到全局变量 nextbno 来设置这些磁盘块被使用,这里之所以可以使用这个全局变量就是因为,在分配磁盘块的过程中我们统一使用 next_block 这个函数统一分配磁盘块,同时会将 nextbno++ ,这样在刷新 disk 的存储的时候,我们只需要遍历将 [0,nextbno) 中的磁盘编号对应的bit置为0即可。

1
2
3
4
5
int next_block(int type)
{
disk[nextbno].type = type;
return nextbno++;
}

对于一个文件来说,为他分配了磁盘块之后,他的文件控制块(FCB)也应该相对应的发生改变,比如需要修改这个 FCB 中的 file_size ,在这个文件控制块中记录磁盘块的变量中增加这个新分配的磁盘块。这一步是通过 make_link_block 这个函数做的 :

1
2
3
4
5
6
7
int make_link_block(struct File *dirf, int nblk)
{
int bno = next_block(BLOCK_FILE);
save_block_link(dirf, nblk, bno);
dirf->f_size += BLOCK_SIZE;
return bno;
}

他会调用这个 save_block_link 函数 :

1
2
3
4
5
6
7
8
9
10
11
12
13
14
15
16
void save_block_link(struct File *f, int nblk, int bno)
{
assert(nblk < NINDIRECT); // if not, file is too large !
if (nblk < NDIRECT)
{
f->f_direct[nblk] = bno;
}
else
{
if (f->f_indirect == 0)
{
f->f_indirect = next_block(BLOCK_INDEX);
}
((uint32_t *)(disk[f->f_indirect].data))[nblk] = bno;
}
}

其实很简单,save_block_link 会在文件控制块之中添加这个新分配的磁盘块的索引,具体如果文件当前使用的磁盘块没有超过直接索引的范围,则直接在直接索引的数组中添加上这个新分配的磁盘块编号即可;否则,则需要将间接索引对应的磁盘块中加入这个新分配的磁盘块编号。

通过这一步,后续便可以通过这个FCB找到这个磁盘块,make_link_block 相当于在分配一个新的磁盘块之后,同时添加了新分配的磁盘块与这个文件之间的连接,同时对于这个文件的部分内容进行了修改。

接下来就可以具体看看 create_file 函数了 :

1
2
3
4
5
6
7
8
9
10
11
12
13
14
15
16
17
18
19
20
21
22
23
24
25
26
struct File *create_file(struct File *dirf)
{
int nblk = dirf->f_size / BLOCK_SIZE;
for (int i = 0; i < nblk; ++i)
{
int bno; // the block number
if (i < NDIRECT)
{
bno = dirf->f_direct[i];
}
else
{
bno = ((uint32_t *)(disk[dirf->f_indirect].data))[i - NDIRECT];
}
struct File *blk = (struct File *)(disk[bno].data);
for (struct File *f = blk; f < blk + FILE2BLK; ++f)
{
if (f->f_name[0] == '\0')
{
return f;
}
}
}
int bno = make_link_block(dirf, nblk);
    return (struct File *)(disk[bno].data);
}

先解释这个 FILE2BLK 对于一个目录来说,他的磁盘块中存储的是文件控制块FCB,在 fs.h 中有 :

1
2
3
#define BLOCK_SIZE PAGE_SIZE
#define FILE_STRUCT_SIZE 256
#define FILE2BLK (BLOCK_SIZE / sizeof(struct File))

那这个FILE2BLK其实就是一个磁盘块中存储的FCB的数量。

再看看这个 create_file 函数,其实就是先找到这个目录的所有磁盘块,取出来每一个磁盘块中的文件控制块,如果存在FCB中的文件名称为空,则说明这个FCB没有被占用,直接返回这个FCB ;如果不存在FCB没有被占用的情况,则就通过 make_link_block 函数为他分配一个新的磁盘块,再将这个新的磁盘块的第一个FCB的指针返回。相当于如果当前目录下有空闲的FCB,就用空闲的,如果没有空闲的那就重新分配一个磁盘块,从中取出一个FCB使用。

现在我们就可以理解这个 write_file 函数了:

1
2
3
4
5
6
7
8
9
10
11
12
13
14
15
16
17
18
19
20
21
22
23
24
25
26
27
28
29
30
31
void write_file(struct File *dirf, const char *path)
{
int iblk = 0, r = 0, n = sizeof(disk[0].data);
struct File *target = create_file(dirf);
/* in case `create_file` is't filled */
if (target == NULL)
{
return;
}
int fd = open(path, O_RDONLY);
// Get file name with no path prefix.
const char *fname = strrchr(path, '/');
if (fname)
{
fname++;
}
else
{
fname = path;
}
strcpy(target->f_name, fname);
target->f_size = lseek(fd, 0, SEEK_END);
target->f_type = FTYPE_REG;
// Start reading file.
lseek(fd, 0, SEEK_SET);
while ((r = read(fd, disk[nextbno].data, n)) > 0)
{
save_block_link(target, iblk++, next_block(BLOCK_DATA));
}
close(fd); // Close file descriptor.
}

实现了把宿主机中的一个普通文件 path 写入到自制文件系统镜像 disk[] 中,并在目录 dirf 下生成对应的文件控制块。其中,使用 create_filedirf 下创建了一个FCB,再将目标目录中的文件内容通过 read 函数写入 disk 中的同时,使用 save_block_link 将这个新的FCB与对应的磁盘块建立联系。再结合 main 函数看一眼,这里的 dirf 其实就是super块里的根目录 File 结构 。

这里需要说明,这个super块,是文件系统的总控制块,保存整个文件系统的基本信息和根目录入口,也就是 super.root

同样的 write_directory 和这个几乎一摸一样,只是对于一个目录来说,下面可能既有目录也有文件,如果是文件,直接调用 write_file ,否则就递归调用 write_directory

这样就实现了将宿主机中的文件/目录写入 disk 中,同时维护好了这个super块和每一个FCB与磁盘块的映射关系,最后再通过 flush_bitmapfinish_fs 这样就实现了将文件写入磁盘镜像中。通过这些步骤就成功实现了在mos内核中创建一个简单的文件系统结构了。

文件系统的具体实现

通过上面的步骤,我们在mos中创建了一个磁盘镜像,再结合我们最开始实现的对于磁盘的读写的函数:ide_readide_write ,我们应该可以实现对于磁盘中内容的读写了。我们现在能实现给你一个磁盘块的编号就可以读取磁盘上对应位置的数据,但是,如果我们想要实现对于一个文件进行读写,这些函数肯定还是不行的,因为给你一个文件名,你想要获得他在磁盘中的位置,他占用了多少个磁盘块,这对于用户来说是很困难的事情。所以我们需要对现在的这两个函数进行进一步的封装,实现对于文件的操作。

首先我们要实现的是对于磁盘块数据的读写

在操作这个磁盘中的数据的过程中,由于对于硬盘 I/O 操作一次只能读取少量数据,同时频繁读写磁盘会拖慢系统,故常用块缓存将数据暂存于内存,减少磁盘访问次数,从而加快数据读取。意思是每次读取磁盘数据会读取一个磁盘块的数据,将他放入缓存中。这里在指导书中提到:将 DISKMAP 到 DISKMAP+DISKMAX 这一段虚存地址空间(0x10000000-0x4FFFFFFF) 作为缓冲区,这一段的大小为1G ,但是我们再看看我们的磁盘,经过简单的计算:
1024 * 4096 得到我们的磁盘大小是4M 。 。 。这也就意味着,我们可以随便把磁盘中的内容放进缓冲区。实验中采取线性映射的方法,使用 disk_addr 函数,实现了对于磁盘编号为 blockno 的磁盘块映射到对应的缓冲区的地址,这个地方得到的就是这个磁盘块映射到的虚拟地址

1
2
3
void *disk_addr(u_int blockno) {
    return (void *)DISKMAP + blockno * BLOCK_SIZE ;
}

当然,除了为他分配需要的虚拟地址,还需要为这个磁盘块分配物理页来保存这个磁盘块的内容。这里又有一系列函数用来实现这个过程。一方面要看这个磁盘块是否已经映射到了物理页上,另一方面要实现对于磁盘块的内容与物理页的映射的map与unmap

首先,实现判断磁盘块是否已经映射到物理页:调用位于 fs/fs.c 中的函数 block_is_mapped

1
2
3
4
5
6
7
void *block_is_mapped(u_int blockno) {
void *va = disk_addr(blockno);
if (va_is_mapped(va)) {
return va;
}
return NULL;
}

其中:

1
2
3
int va_is_mapped(void *va) {
    return (vpd[PDX(va)] & PTE_V) && (vpt[VPN(va)] & PTE_V);
}

就是看这个va对应的页表中的一级页表项和二级页表项是否有效,如果有效,则这个磁盘块对应的va映射到了一个物理页,也就是说,这个磁盘块已经映射到了一个物理页了。

再看是如何给这个磁盘块映射到一个物理页上的:

1
2
3
4
5
6
7
int map_block(u_int blockno) {
// Step 1: If the block is already mapped in cache, return 0.
if(block_is_mapped(blockno)) return 0;
// Step 2: Alloc a page in permission 'PTE_D' via syscall.
void *va = disk_addr(blockno);
return syscall_mem_alloc(0, va, PTE_D);
}

如果已经映射了,则直接返回,否则,通过系统调用 syscall_mem_alloc 来为这个磁盘块对应的虚拟地址分配一个物理页。

再看看是如何给这个磁盘块解除映射的:

1
2
3
4
5
6
7
8
9
10
11
12
void unmap_block(u_int blockno) {
// Step 1: Get the mapped address of the cache page of this block using 'block_is_mapped'.
void *va;
va = block_is_mapped(blockno) ;
// Step 2: If this block is used (not free) and dirty in cache, write it back to the disk
// first.
if(!block_is_free(blockno) && block_is_dirty(blockno))
write_block(blockno);
// Step 3: Unmap the virtual address via syscall.
if(va) syscall_mem_unmap(0, va);
user_assert(!block_is_mapped(blockno));
}

这里与增加映射不一样的地方在于,如果我的缓存中的磁盘内容已经被更改,那么我需要再接触这个缓存和磁盘块的映射之前将缓存中的内容写入这个磁盘块中,从而保证前后内容的一致。

这里要判断这个磁盘块是否被更改,使用两个函数:

1
2
3
4
5
6
7
8
9
int block_is_free(u_int blockno) {
if (super == 0 || blockno >= super->s_nblocks) {
return 0;
}
if (bitmap[blockno / 32] & (1 << (blockno % 32))) {
return 1;
}
return 0;
}

这个函数通过在位图中的bit,来判断这个磁盘块是否被使用,如果空闲返回1,否则返回0 。

1
2
3
4
int block_is_dirty(u_int blockno) {
    void *va = disk_addr(blockno);
    return va_is_dirty(va);
}

这个函数通过查看磁盘块对应的虚拟地址的vpt中是否有脏位(这个脏位具体在write_block函数中),如果有,则认为缓存中的内容已经被更改。

如果这个磁盘块被使用了,而且缓存中的内容也被修改了,则需要调用 write_block 函数:

1
2
3
4
5
6
7
8
9
10
void write_block(u_int blockno) {
// Step 1: detect is this block is mapped, if not, can't write it's data to disk.
if (!block_is_mapped(blockno)) {
user_panic("write unmapped block %08x", blockno);
}
// Step2: write data to IDE disk. (using ide_write, and the diskno is 0)
void *va = disk_addr(blockno);
ide_write(0, blockno * SECT2BLK, va, SECT2BLK);
syscall_mem_map(0, va, 0, va, PTE_D);
}

注意: 这个地方中 blockno 是磁盘块号,而在ide读写的要求是要得到这个扇区号,通过代码发现一个扇区是512B,而一个磁盘块是4096B,很显然两个不一样大,所以在读的过程中需要宏 SECT2BLK 等宏处理一下。

这里还有 read_block 函数,实现了将 blockno 的磁盘块的内容读出来,读入的虚拟地址为 *blk ,通过 *isnew 说明读入的磁盘块之前是否已经被读入,后面两个参数如果传入为 NULL ,则不会返回。

1
2
3
4
5
6
7
8
9
10
11
12
13
14
15
16
17
18
19
20
21
22
23
24
25
26
27
28
29
int read_block(u_int blockno, void **blk, u_int *isnew) {
// Step 1: validate blockno. Make file the block to read is within the disk.
if (super && blockno >= super->s_nblocks) {
user_panic("reading non-existent block %08x\n", blockno);
}
// Step 2: validate this block is used, not free.
if (bitmap && block_is_free(blockno)) {
user_panic("reading free block %08x\n", blockno);
}
// Step 3: transform block number to corresponding virtual address.
void *va = disk_addr(blockno);
// Step 4: read disk and set *isnew.
if (block_is_mapped(blockno)) { // the block is in memory
if (isnew) {
*isnew = 0;
}
} else { // the block is not in memory
if (isnew) {
*isnew = 1;
}
try(syscall_mem_alloc(0, va, PTE_D));
ide_read(0, blockno * SECT2BLK, va, SECT2BLK);
}
// Step 5: if blk != NULL, assign 'va' to '*blk'.
if (blk) {
*blk = va;
}
return 0;
}

除了对于磁盘块的读入读出之外,还需要实现对于一个磁盘块的磁盘空间管理,也就是我们还要能够实现能够像物理页面一样实现对于空闲磁盘块的申请已使用的磁盘块的释放。这里我们实现了 alloc_blockfree_block 两个函数。这里的重点在于对于位图的读取和对于位图的修改。

先说 alloc_block :

1
2
3
4
5
6
7
8
9
10
11
12
13
14
15
int alloc_block(void) {
int r, bno;
// Step 1: find a free block.
if ((r = alloc_block_num()) < 0) { // failed.
return r;
}
bno = r;
// Step 2: map this block into memory.
if ((r = map_block(bno)) < 0) {
free_block(bno);
return r;
}
// Step 3: return block number.
return bno;
}

这里的 alloc_block_num 函数用于寻找空闲的磁盘块,如果找到了空闲的磁盘块,就把他与一个物理页建立映射关系,最后返回这个磁盘块的编号。下面是 alloc_block_num ,关键点在于对于从super块读取位图,和对位图的更新。通过super块得到了整个文件系统的大小,进一步得到位图的大小;遍历位图上的每一个位,如果位图上这一个bit为1(free)就把这个位置为0,同时把缓存中的内容通过 write_block 回写到磁盘中。

1
2
3
4
5
6
7
8
9
10
11
12
13
14
15
int alloc_block_num(void) {
int blockno;
u_int nbitmap = (super->s_nblocks + BLOCK_SIZE_BIT - 1) / BLOCK_SIZE_BIT;
// walk through this bitmap, find a free one and mark it as used, then sync
// this block to IDE disk (using `write_block`) from memory.
for (blockno = nbitmap + 2; blockno < super->s_nblocks; blockno++) {
if (bitmap[blockno / 32] & (1 << (blockno % 32))) { // the block is free
bitmap[blockno / 32] &= ~(1 << (blockno % 32));
write_block(blockno / BLOCK_SIZE_BIT + 2); // write to disk.
return blockno;
}
}
// no free blocks.
return -E_NO_DISK;
}

再说 free_block 函数,这个函数其实非常简单,只需要更新位图,解除映射,回写到磁盘就结束了。

1
2
3
4
5
6
7
8
9
10
11
void free_block(u_int blockno) {
// You can refer to the function 'block_is_free' above.
// Step 1: If 'blockno' is invalid (0 or >= the number of blocks in 'super'), return.
if ( blockno == 0 || blockno >= super->s_nblocks ) return ;
// Step 2: Set the flag bit of 'blockno' in 'bitmap'.
bitmap[blockno / 32] |= 1 << (blockno % 32);
write_block(blockno / BLOCK_SIZE_BIT + 2);
if (block_is_mapped(blockno)) {
unmap_block(blockno);
}
}

在实现了对磁盘块的处理之后,就要实现对于文件中块的操作了

这里在前面的基础上,实现了对于文件操作的几个函数:file_block_walkfile_map_block , file_get_blockfile_clear_block

先说这个 file_block_walk 函数,这个函数和 pgdir_walk 函数非常相像,实现了根据文件内的块号 filebno
找到它在 File 结构中应该存放磁盘块号的位置,这里其实就是得到的 **ppdiskbno 就是这个文件块所存放的磁盘块的编号 。(这里其实可以具体看 file_map_block 函数 )
如果 filebno 小于直接块数量,那么位置就在 f->f_direct[filebno]。 如果 filebno 超过直接块范围,那么位置就在 f->f_indirect 指向的间接块中。 如果需要间接块,但是目前还没有, 并且 alloc 参数允许分配, 那么函数会自动分配一个间接块。

1
2
3
4
5
6
7
8
9
10
11
12
13
14
15
16
17
18
19
20
21
22
23
24
25
26
27
28
29
30
31
32
33
int file_block_walk(struct File *f, u_int filebno, uint32_t **ppdiskbno, u_int alloc) {
int r;
uint32_t *ptr;
uint32_t *blk;
if (filebno < NDIRECT) {
// Step 1: if the target block is corresponded to a direct pointer, just return the
// disk block number.
ptr = &f->f_direct[filebno];
} else if (filebno < NINDIRECT) {
// Step 2: if the target block is corresponded to the indirect block, but there's no
// indirect block and `alloc` is set, create the indirect block.
if (f->f_indirect == 0) {
if (alloc == 0) {
return -E_NOT_FOUND;
}
if ((r = alloc_block()) < 0) {
return r;
}
f->f_indirect = r;
dirty_fcb(f);
}
// Step 3: read the new indirect block to memory.
if ((r = read_block(f->f_indirect, (void **)&blk, 0)) < 0) {
return r;
}
ptr = blk + filebno;
} else {
return -E_INVAL;
}
// Step 4: store the result into *ppdiskbno, and return 0.
*ppdiskbno = ptr;
return 0;
}

再看 file_map_block :在文件 f 下找第 filebno 块对应的文件块在磁盘所存放的磁盘块的编号,本质就是对上一个 file_block_walk 的一次封装。

1
2
3
4
5
6
7
8
9
10
11
12
13
14
15
16
17
18
19
20
21
int file_map_block(struct File *f, u_int filebno, u_int *diskbno, u_int alloc) {
int r;
uint32_t *ptr;
// Step 1: find the pointer for the target block.
if ((r = file_block_walk(f, filebno, &ptr, alloc)) < 0) {
return r;
}
// Step 2: if the block not exists, and create is set, alloc one.
if (*ptr == 0) {
if (alloc == 0) {
return -E_NOT_FOUND;
}
if ((r = alloc_block()) < 0) {
return r;
}
*ptr = r;
}
// Step 3: set the pointer to the block in *diskbno and return 0.
*diskbno = *ptr;
return 0;
}

这里有一个函数 dirty_fcb :在 f 的父目录 f->f_dir 的目录数据块中,找到哪个目录数据块包含这个 struct File f
然后只把那个目录数据块标脏。

1
2
3
4
5
6
7
8
9
10
11
12
13
14
15
16
17
18
void dirty_fcb(struct File *f) {
if (f->f_dir) {
u_int nblock = f->f_dir->f_size / BLOCK_SIZE;
for (int i = 0; i < nblock; i++) {
u_int diskbno;
struct File *files;
if (file_map_block(f->f_dir, i, &diskbno, 0) < 0) {
debugf("dirty_fcb: file_map_block failed\n");
break;
}
files = disk_addr(diskbno);
if (files <= f && f < files + FILE2BLK) {
dirty_block(diskbno);
break;
}
}
}
}

这个 dirty_block 就是给这个 blockno 对应的 va 对应的 vpt 的权限位加一个 PTE_DIRTY

1
2
3
4
5
6
7
8
9
10
int dirty_block(u_int blockno) {
void *va = disk_addr(blockno);
if (!va_is_mapped(va)) {
return -E_NOT_FOUND;
}
if (va_is_dirty(va)) {
return 0;
}
return syscall_mem_map(0, va, 0, va, PTE_D | PTE_DIRTY);
}

还有函数 file_clear_block ,从文件 f 中移除一个文件块 ,函数 file_get_block 得到文件第 filebno 个数据块在块缓存中的虚拟地址。这里都代码都比较容易理解,不多做赘述。

1
2
3
4
5
6
7
8
9
10
11
12
13
14
15
16
17
18
19
20
21
22
23
24
25
26
27
int file_clear_block(struct File *f, u_int filebno) {
int r;
uint32_t *ptr;
if ((r = file_block_walk(f, filebno, &ptr, 0)) < 0) {
return r;
}
if (*ptr) {
free_block(*ptr);
*ptr = 0;
}
return 0;
}

int file_get_block(struct File *f, u_int filebno, void **blk) {
int r;
u_int diskbno;
u_int isnew;
// Step 1: find the disk block number is `f` using `file_map_block`.
if ((r = file_map_block(f, filebno, &diskbno, 1)) < 0) {
return r;
}
// Step 2: read the data in this disk to blk.
if ((r = read_block(diskbno, blk, &isnew)) < 0) {
return r;
}
return 0;
}

目录也是一种文件,这里还实现了 dir_lookupdir_alloc_file 两个函数,用来实现对目录的操作。

dir_lookup 这个函数寻找目录下的文件名为name的文件,通过一个指针返回。

1
2
3
4
5
6
7
8
9
10
11
12
13
14
15
16
17
18
19
20
21
22
23
24
25
int dir_lookup(struct File *dir, char *name, struct File **file) {
// Step 1: Calculate the number of blocks in 'dir' via its size.
u_int nblock;
nblock = (dir->f_size + BLOCK_SIZE - 1) / BLOCK_SIZE ;
// Step 2: Iterate through all blocks in the directory.
for (int i = 0; i < nblock; i++) {
// Read the i'th block of 'dir' and get its address in 'blk' using 'file_get_block'.
void *blk;
int r ;
if( (r = file_get_block(dir, i, &blk)) < 0) return r ;
struct File *files = (struct File *)blk;
// Find the target among all 'File's in this block.
for (struct File *f = files; f < files + FILE2BLK; ++f) {
// Compare the file name against 'name' using 'strcmp'.
// If we find the target file, set '*file' to it and set up its 'f_dir'
// field.
if( strcmp(name , f->f_name) == 0 ) {
f->f_dir = dir ;
*file = f ;
return 0;
}
}
}
return -E_NOT_FOUND;
}

dir_alloc_file 则实现了为 dir 分配一个文件控制块的大小,如果目录中有空闲的直接返回,否则分配一个磁盘块,从中取出一个空闲的文件控制块通过 file 指针返回。

1
2
3
4
5
6
7
8
9
10
11
12
13
14
15
16
17
18
19
20
21
22
23
24
25
26
27
28
29
30
int dir_alloc_file(struct File *dir, struct File **file) {
int r;
u_int nblock, i, j;
void *blk;
struct File *f;
nblock = dir->f_size / BLOCK_SIZE;
for (i = 0; i < nblock; i++) {
// read the block.
if ((r = file_get_block(dir, i, &blk)) < 0) {
return r;
}
f = blk;
for (j = 0; j < FILE2BLK; j++) {
if (f[j].f_name[0] == '\0') { // found free File structure.
*file = &f[j];
return 0;
}
}
}
// no free File structure in exists data block.
// new data block need to be created.
dir->f_size += BLOCK_SIZE;
dirty_fcb(dir);
if ((r = file_get_block(dir, i, &blk)) < 0) {
return r;
}
f = blk;
*file = &f[0];
return 0;
}

在实现了这些基本功能之后,还需要进一步实现对于一个文件的打开关闭读写等操作

首先需要看看一个基本的函数 walk_path :从根目录开始寻找路径为 path 的文件,并返回:目标文件 pfile、它所在的父目录 pdir,以及最后一级名字 lastelem 。本质就是对 dir_lookup 的进一步封装。最开始的目录是根目录,每一次从 path 中从前往后取出来一个文件名称,在当前目录下进行寻找,再循环如此,最终找到这个路径对应的文件。这个函数只有在能找到 path 的文件,或者在这个文件没有被找到,但是目前已经到达这个文件的目录的时候 ,才会设置对应的 pdirlastelem

1
2
3
4
5
6
7
8
9
10
11
12
13
14
15
16
17
18
19
20
21
22
23
24
25
26
27
28
29
30
31
32
33
34
35
36
37
38
39
40
41
42
43
44
45
46
47
48
49
50
int walk_path(char *path, struct File **pdir, struct File **pfile, char *lastelem) {
char *p;
char name[MAXNAMELEN];
struct File *dir, *file;
int r;
// start at the root.
path = skip_slash(path);
file = &super->s_root;
dir = 0;
name[0] = 0;
if (pdir) {
*pdir = 0;
}
*pfile = 0;
// find the target file by name recursively.
while (*path != '\0') {
dir = file;
p = path;

while (*path != '/' && *path != '\0') {
path++;
}
if (path - p >= MAXNAMELEN) {
return -E_BAD_PATH;
}
memcpy(name, p, path - p);
name[path - p] = '\0';
path = skip_slash(path);
if (dir->f_type != FTYPE_DIR) {
return -E_NOT_FOUND;
}
if ((r = dir_lookup(dir, name, &file)) < 0) {
if (r == -E_NOT_FOUND && *path == '\0') {
if (pdir) {
*pdir = dir;
}
if (lastelem) {
strcpy(lastelem, name);
}
*pfile = 0;
}
return r;
}
}
if (pdir) {
*pdir = dir;
}
*pfile = file;
return 0;
}

则现在就可以实现 file_open :本质就是通过路径找到这个文件,返回这个文件控制块。

1
2
3
 int file_open(char *path, struct File **file) {
    return walk_path(path, 0, file, 0);
}

对应的 file_close 会先 file_flush(f),把文件相关脏块写回磁盘;如果 f 是普通文件,则遍历它的数据块并 unmap_block。目录文件不在这里按普通文件数据块方式全部 unmap

1
2
3
4
5
6
7
8
9
10
11
12
13
14
15
void file_close(struct File *f) {
// Flush the file itself. Then unmap all blocks of the file.
file_flush(f);
if (f->f_type == FTYPE_REG) {
u_int nblock = f->f_size / BLOCK_SIZE;
for (int i = 0; i < nblock; i++) {
u_int diskbno;
if (file_map_block(f, i, &diskbno, 0) < 0) {
debugf("file_close: file_map_block failed\n");
break;
}
unmap_block(diskbno);
}
}
}

除了打开文件之外,还可以实现对于一个文件的创建file_create 。先使用 walk_path 查看文件是否存在,如果不存在,则查看他的最近一级目录是否存在。如果不存在,则创建文件失败;如果存在,那么就在这个目录下创建需要的文件的FCB :为这个 dir 使用函数 dir_alloc_file 创建一个FCB ,并设置这个FCB的一些基本信息,最后再刷新这个新创建的文件的目录到磁盘。

1
2
3
4
5
6
7
8
9
10
11
12
13
14
15
16
17
18
19
20
21
22
23
24
25
26
27
28
29
30
31
32
33
int file_create(char *path, struct File **file) {
char name[MAXNAMELEN];
int r;
struct File *dir, *f;

if ((r = walk_path(path, &dir, &f, name)) == 0) {
return -E_FILE_EXISTS;
}

if (r != -E_NOT_FOUND || dir == 0) {
return r;
}

if (dir_alloc_file(dir, &f) < 0) {
return r;
}

strcpy(f->f_name, name);
f->f_size = 0;
f->f_type = FTYPE_REG;
for (int i = 0; i < NDIRECT; i++) {
f->f_direct[i] = 0;
}
f->f_indirect = 0;
f->f_dir = dir;

dirty_fcb(f);
if (f->f_dir) {
file_flush(f->f_dir);
}
*file = f;
return 0;
}

通过上述的方式实现了创建路径为 path 的文件。

在实现了创建一个文件之后,就是对一个文件进行删除和释放了。这里我们要实现函数 file_truncatefile_set_sizefile_remove

先看核心函数 file_truncate ,他的作用是f把文件的逻辑大小f_size 截断为 newsize,并释放 newsize 之后不再需要的文件数据块。
如果新的文件大小需要的文件块可以直接映射得到,则只需要释放多的直接映射块和间接映射块(如果存在);
否则就只需要删除这个间接映射中多余的文件块即可。
这个函数主要用来缩小文件的大小。

1
2
3
4
5
6
7
8
9
10
11
12
13
14
15
16
17
18
19
20
21
22
23
void file_truncate(struct File *f, u_int newsize) {
u_int bno, old_nblocks, new_nblocks;
old_nblocks = ROUND(f->f_size, BLOCK_SIZE) / BLOCK_SIZE;
new_nblocks = ROUND(newsize, BLOCK_SIZE) / BLOCK_SIZE;
if (newsize == 0) {
new_nblocks = 0;
}
if (new_nblocks <= NDIRECT) {
for (bno = new_nblocks; bno < old_nblocks; bno++) {
panic_on(file_clear_block(f, bno));
}
if (f->f_indirect) {
free_block(f->f_indirect);
f->f_indirect = 0;
}
} else {
for (bno = new_nblocks; bno < old_nblocks; bno++) {
panic_on(file_clear_block(f, bno));
}
}
f->f_size = newsize;
dirty_fcb(f);
}

对应的 file_set_size 就是实现了对与上述函数的一层封装,使用上面的函数减小文件大小,同时实现了对于文件大小增加的功能。

1
2
3
4
5
6
7
8
9
int file_set_size(struct File *f, u_int newsize) {
if (f->f_size > newsize) {
file_truncate(f, newsize);
} else {
f->f_size = newsize;
dirty_fcb(f);
}
return 0;
}

file_remove 则就是通过 path 找到文件之后,将文件大小变为0,再刷新磁盘即可。

1
2
3
4
5
6
7
8
9
10
11
12
13
14
15
16
17
18
int file_remove(char *path) {
int r;
struct File *f;
// Step 1: find the file on the disk.
if ((r = walk_path(path, 0, &f, 0)) < 0) {
return r;
}
// Step 2: truncate it's size to zero.
file_truncate(f, 0);
// Step 3: clear it's name.
f->f_name[0] = '\0';
// Step 4: flush f's f_dir.
dirty_fcb(f);
if (f->f_dir) {
file_flush(f->f_dir);
}
return 0;
}

至此,我们实现了对于文件系统中对 磁盘块, 文件块, 文件/目录的一系列操作。

文件系统的用户接口

MOS 操作系统内核符合一个典型的微内核的设计,文件系统属于用户态进程,以服务的形式供其他进程调用。也就是说,如果我们想要实现对于文件的操作,本质上是通过文件系统服务进程来实现的。

这里的意思是:普通用户进程自己不直接操作磁盘,而是把“我要打开文件 / 映射文件块 / 关闭文件 / 同步文件”等请求,通过 IPC 发给 文件服务进程 fs server。文件服务进程收到请求后,替用户进程操作磁盘和文件系统元数据,再把结果返回给用户进程。

这一部分主要说明:这个文件系统服务进程如何实现对于文件的开关读写

对于文件系统服务进程来说,对文件进行操作的时候需要使用文件描述符来存储文件的基本信息和用户进程中关于文件的状态;同时,文件描述符也起到描述用户对于文件操作的作用。这里先介绍两个在用户态使用的结构体 :FdFileFd

1
2
3
4
5
6
7
8
9
10
struct Fd {
u_int fd_dev_id;
u_int fd_offset;
u_int fd_omode;
};
struct Filefd {
struct Fd f_fd;
u_int f_fileid;
struct File f_file;
};

Fd 是文件标识符,包含三个参数,分别为:
fd_dev_id:这个 fd 属于哪个设备,比如普通文件、控制台、管道。
fd_offset:当前读写偏移。read() / write() 后会更新它。
fd_omode:打开模式,比如 O_RDONLY、O_WRONLY、O_RDWR

FCB / struct File 描述的是文件本身,是磁盘文件系统中的元数据。
Fd 描述的是某个进程打开文件后的状态,例如当前偏移量、打开模式、设备类型。
Filefd 则是普通文件设备专用的 fd 结构,它在 Fd 的基础上额外保存 fileidstruct File 的副本。

很显然,这个 Fd 其实和 FCB 类似,在 user/lib/fd.c 中实现了用户态中对于 Fd 操作的一系列函数。
user/include/fd.h 中给出了 Fd 的定义和相关的宏 :每一个进程最多32个 Fd ,还有 Fd 存储的虚拟地址以及范围,还有通过 Fd 编号得到对应的虚拟地址的宏。
INDEX2FD(i) 得到第 i 个 fd 的“文件描述符结构体页”的虚拟地址
INDEX2DATA(i) 得到第 i 个 fd 对应的“文件数据映射区”的虚拟地址

1
2
3
4
5
6
#define MAXFD 32
#define FILEBASE 0x60000000
#define FDTABLE (FILEBASE - PDMAP)

#define INDEX2FD(i) (FDTABLE + (i) * PTMAP)
#define INDEX2DATA(i) (FILEBASE + (i) * PDMAP)

总体的布局大概是这样:

1
2
3
4
5
6
7
8
9
10
11
12
13
14
15
16
17
18
19
20
21
22
23
低地址
...
FDTABLE
|
|-- INDEX2FD(0) fd 0 的描述符页
|
|-- INDEX2FD(1) fd 1 的描述符页
|
|-- INDEX2FD(2) fd 2 的描述符页
|
...
|-- INDEX2FD(31) fd 31 的描述符页

FILEBASE
|
|-- INDEX2DATA(0) fd 0 的文件数据映射区
|
|-- INDEX2DATA(1) fd 1 的文件数据映射区
|
|-- INDEX2DATA(2) fd 2 的文件数据映射区
|
...
|-- INDEX2DATA(31) fd 31 的文件数据映射区

下面按 user/lib/fd.c 中的函数顺序,总结它们对 Fd 的操作作用。

fd.c 的整体定位是:用户态文件描述符管理层。它负责 fd 的分配、查找、关闭、复制,以及把 read/write/close/stat 分发给具体设备,比如 file、console、pipe。

dev_lookup(int dev_id, struct Dev **dev) :根据 fd->fd_dev_id 查找对应设备结构 struct Dev

1
2
3
4
5
6
7
8
9
10
11
int dev_lookup(int dev_id, struct Dev **dev) {
for (int i = 0; devtab[i]; i++) {
if (devtab[i]->dev_id == dev_id) {
*dev = devtab[i];
return 0;
}
}
*dev = NULL;
debugf("[%08x] unknown device type %d\n", env->env_id, dev_id);
return -E_INVAL;
}

例如普通文件的 dev_id 对应 devfile,控制台对应 devcons,管道对应 devpipe

它的作用是让通用的 read/write/close 能够根据 fd 类型调用不同设备的处理函数:

1
2
3
4
dev->dev_read
dev->dev_write
dev->dev_close
dev->dev_stat

fd_alloc(struct Fd **fd) :寻找一个空闲的 fd 位置。

1
2
3
4
5
6
7
8
9
10
11
12
13
14
15
16
int fd_alloc(struct Fd **fd) {
u_int va;
u_int fdno;
for (fdno = 0; fdno < MAXFD - 1; fdno++) {
va = INDEX2FD(fdno);
if ((vpd[va / PDMAP] & PTE_V) == 0) {
*fd = (struct Fd *)va;
return 0;
}
if ((vpt[va / PTMAP] & PTE_V) == 0) { // the fd is not used
*fd = (struct Fd *)va;
return 0;
}
}
return -E_MAX_OPEN;
}

它会从 0MAXFD - 1 扫描,检查每个 fd 对应的虚拟地址是否已经映射:如果该 fd 页没有映射,就认为这个 fd 编号空闲,并把地址返回到 *fd。注意:fd_alloc() 只找空位,不分配物理页。真正映射 fd 页通常由后续操作完成,比如普通文件打开时由文件服务进程把 Filefd 页映射回来。

fd_close(struct Fd *fd) :关闭一个 fd 页本身。

1
2
3
void fd_close(struct Fd *fd) {
    panic_on(syscall_mem_unmap(0, fd));
}

它只是取消当前进程中这个 fd 页的映射。页一旦取消映射,这个 fd 编号就重新变为空闲。
注意:它不负责通知具体设备关闭文件。真正的完整关闭流程在 close() 中完成。

fd_lookup(int fdnum, struct Fd **fd) :根据 fd 编号找到对应的 struct Fd *。检查这个 Fd 对应的虚拟地址是否已经映射。如果映射存在,说明 fd 有效。

1
2
3
4
5
6
7
8
9
10
11
12
int fd_lookup(int fdnum, struct Fd **fd) {
u_int va;
if (fdnum >= MAXFD) {
return -E_INVAL;
}
va = INDEX2FD(fdnum);
if ((vpt[va / PTMAP] & PTE_V) != 0) { // the fd is used
*fd = (struct Fd *)va;
return 0;
}
return -E_INVAL;
}

fd2data(struct Fd *fd) :根据一个 Fd * 找到该 fd 对应的数据映射区。

1
2
3
void *fd2data(struct Fd *fd) {
    return (void *)INDEX2DATA(fd2num(fd));
}

fd2num(struct Fd *fd) :根据 Fd * 地址反推出 fd 编号。

1
2
3
int fd2num(struct Fd *fd) {
    return ((u_int)fd - FDTABLE) / PTMAP;
}

num2fd(int fd) :根据 fd 编号计算对应的 fd 虚拟地址。

1
2
3
int num2fd(int fd) {
    return fd * PTMAP + FDTABLE;
}

它和 fd2num() 是相反方向的转换。

close(int fdnum) :完整关闭一个 fd。
流程是:

  1. fd_lookup() 找到 Fd
  2. dev_lookup() 找到对应设备。
  3. 调用设备自己的关闭函数:
1
2
3
4
5
6
7
8
9
10
11
int close(int fdnum) {
int r;
struct Dev *dev = NULL;
struct Fd *fd;
if ((r = fd_lookup(fdnum, &fd)) < 0 || (r = dev_lookup(fd->fd_dev_id, &dev)) < 0) {
return r;
}
r = (*dev->dev_close)(fd);
fd_close(fd);
return r;
}

对于lab5来说,通过 dev_lookup 找到的 dev 就是 devfile ,定义在 user/lib/file.c 中 :

1
2
3
4
5
6
7
8
struct Dev devfile = {
    .dev_id = 'f',
    .dev_name = "file",
    .dev_read = file_read,
    .dev_write = file_write,
    .dev_close = file_close,
    .dev_stat = file_stat,
};

也就是说,这个close 函数在关闭一个 Fd 的同时还通过 file.c 中的 file_close 函数同时关闭了这个文件。

close_all(void) :关闭当前进程中所有 fd。

1
2
3
4
5
6
void close_all(void) {
    int i;
    for (i = 0; i < MAXFD; i++) {
        close(i);
    }
}

dup(int oldfdnum, int newfdnum):复制文件描述符。

它会把旧 fd 的 fd 页映射到新 fd 的位置,并且把旧 fd 对应的数据页也映射到新 fd 的数据区域。这样 newfdnumoldfdnum 指向同一个打开对象。它不是重新打开文件,也不是复制文件内容,而是复制/共享页映射。

1
2
3
4
5
6
7
8
9
10
11
12
13
14
15
16
17
18
19
20
21
22
23
24
25
26
27
28
29
30
31
32
33
34
35
36
37
38
39
40
41
42
int dup(int oldfdnum, int newfdnum) {
int i, r;
void *ova, *nva;
u_int pte;
struct Fd *oldfd, *newfd;
/* Step 1: Check if 'oldnum' is valid. if not, return an error code, or get 'fd'. */
if ((r = fd_lookup(oldfdnum, &oldfd)) < 0) {
return r;
}
/* Step 2: Close 'newfdnum' to reset content. */
close(newfdnum);
/* Step 3: Get 'newfd' reffered by 'newfdnum'. */
newfd = (struct Fd *)INDEX2FD(newfdnum);
/* Step 4: Get data address. */
ova = fd2data(oldfd);
nva = fd2data(newfd);
/* Step 5: Dunplicate the data and 'fd' self from old to new. */
if ((r = syscall_mem_map(0, oldfd, 0, newfd, vpt[VPN(oldfd)] & (PTE_D | PTE_LIBRARY))) <
0) {
goto err;
}
if (vpd[PDX(ova)]) {
for (i = 0; i < PDMAP; i += PTMAP) {
pte = vpt[VPN(ova + i)];
if (pte & PTE_V) {
// should be no error here -- pd is already allocated
if ((r = syscall_mem_map(0, (void *)(ova + i), 0, (void *)(nva + i),
pte & (PTE_D | PTE_LIBRARY))) < 0) {
goto err;
}
}
}
}
return newfdnum;
err:
/* If error occurs, cancel all map operations. */
panic_on(syscall_mem_unmap(0, newfd));
for (i = 0; i < PDMAP; i += PTMAP) {
panic_on(syscall_mem_unmap(0, (void *)(nva + i)));
}
return r;
}

read(int fdnum, void *buf, u_int n):通用读接口。从文件中读取最多n个字节写入缓冲区buf里面。
流程是:

  1. fd_lookup() 找到 Fd
  2. dev_lookup() 找到设备。
  3. 检查打开模式,如果是 O_WRONLY,返回错误。
  4. 调用设备自己的读函数:
  5. 如果读取成功,更新:
    所以 read() 本身不关心具体怎么读。普通文件、控制台、管道的读法由各自设备函数决定。对于文件的read 还是通过 file.c 中的 file_read 实现的。
1
2
3
4
5
6
7
8
9
10
11
12
13
14
15
16
17
18
19
int read(int fdnum, void *buf, u_int n) {
int r;
// Step 1: Get 'fd' and 'dev' using 'fd_lookup' and 'dev_lookup'.
struct Dev *dev;
struct Fd *fd;
if ( (r = fd_lookup(fdnum, &fd)) < 0 || (r = dev_lookup(fd->fd_dev_id, &dev)) < 0)
return r ;
// Step 2: Check the open mode in 'fd'.
// Return -E_INVAL if the file is opened for writing only (O_WRONLY).
if ( (fd->fd_omode & O_ACCMODE) == O_WRONLY )
return -E_INVAL;
// Step 3: Read from 'dev' into 'buf' at the seek position (offset in 'fd').
r = dev->dev_read(fd, buf, n, fd->fd_offset);
// Step 4: Update the offset in 'fd' if the read is successful.
if (r > 0) {
fd->fd_offset += r;
}
return r;
}

write(int fdnum, const void *buf, u_int n) :流程和 read() 类似:主要还是通过 file.c 中的 file_write 进行实现,这里不多赘述。

这个地方还有一些其他的函数不再多说明,可以参照下面的表格:

1
2
3
4
5
6
7
8
9
10
fd_alloc    找空闲 fd 地址
fd_lookup fd 编号 -> Fd 指针
fd_close 释放 fd 页
fd2num Fd 指针 -> fd 编号
fd2data Fd 指针 -> 数据映射区
close 完整关闭 fd
dup 复制 fd 映射
read/write 根据 fd_dev_id 分发读写
seek 修改 fd_offset
fstat/stat 获取状态信息

在用户态进程和文件服务进程交互实现文件管理服务

在有了上面的对于文件标识符进行控制的函数之后,我们就可以具体查看在用户态实现文件系统服务的实现。MOS 操作系统中的文件系统服务通过 IPC 的形式供其他进程调用,进行文件读写操作。具体来说,在内核开始运行时,就使用 ENV_CREATE(fs_serv) 启动了文件系统服务进程 fs_serv,用户进程需要进行文件操作时,使用 user/lib/ipc.c 中的 ipc_sendipc_recvfs_serv 进行交互,完成操作。

user/lib/file.c 中我们实现了对于一个用户进程对于文件的打开、关闭、读、写、修改大小等功能,在实现这些功能的过程中,有些功能是不需要ipc进程通信可以直接实现的,有些则需要和文件管理服务进程进行进程的通信,使用我们上面说到的在 fs/fs.c 中的实现的功能来完成。但其实,在 fs/serv.c 中我们实现了对于上述的 fs.c 中的函数的进一步封装,通过调用 ipc 的相关函数实现了文件系统调用函数之后将结果传递给用户进程。

那么到底什么是文件服务进程?
在本实验中,fs_serv 是由内核启动阶段通过 ENV_CREATE(fs_serv) 创建出来的第二个用户环境。它启动后执行 fs/serv.c 的 main(),初始化文件系统,然后进入 serve() 死循环,通过 IPC 接收普通用户进程的文件请求并处理它们。

1
2
3
    ENV_CREATE(user_fstest);
    ENV_CREATE(fs_serv);  // This must be the second env!
    ENV_CREATE(user_devtst);

而文件服务进程其实就是一直运行 fs/serv.c 中的那个main函数,这是一个死循环,不断的等待请求进行处理 :

1
2
3
4
5
6
7
8
int main() {
user_assert(sizeof(struct File) == FILE_STRUCT_SIZE);
debugf("FS is running\n");
serve_init();
fs_init();
serve();
return 0;
}

这里直接看 serve 函数:

1
2
3
4
5
6
7
8
9
10
11
12
13
14
15
16
17
18
19
20
21
22
23
24
void serve(void) {
u_int req, whom, perm;
void (*func)(u_int, u_int);
for (;;) {
perm = 0;
req = ipc_recv(&whom, (void *)REQVA, &perm);
// All requests must contain an argument page
if (!(perm & PTE_V)) {
debugf("Invalid request from %08x: no argument page\n", whom);
continue; // just leave it hanging, waiting for the next request.
}
// The request number must be valid.
if (req < 0 || req >= MAX_FSREQNO) {
debugf("Invalid request code %d from %08x\n", req, whom);
panic_on(syscall_mem_unmap(0, (void *)REQVA));
continue;
}
// Select the serve function and call it.
func = serve_table[req];
func(whom, REQVA);
// Unmap the argument page.
panic_on(syscall_mem_unmap(0, (void *)REQVA));
}
}

为了实现这个serve函数,在 fs/serve.c 中还做了很多准备:
服务向量表,与根据传进来的参数来选择合适的处理函数,同时这里的 serve_open 都是对上面我们说的 file_open 的又一次封装,主要实现对于进程之间的信息传递。这里只说明 serve_open 函数。

1
2
3
4
5
6
7
8
9
void *serve_table[MAX_FSREQNO] = {
    [FSREQ_OPEN] = serve_open,
    [FSREQ_MAP] = serve_map,
    [FSREQ_SET_SIZE] = serve_set_size,
    [FSREQ_CLOSE] = serve_close,
    [FSREQ_DIRTY] = serve_dirty,
    [FSREQ_REMOVE] = serve_remove,
    [FSREQ_SYNC] = serve_sync,
};

先说说进程之间的通信的具体细节。举一个例子具体说明,当用户进程调用 open 函数的时候 :

1
2
3
4
5
6
7
8
9
10
11
12
13
14
15
16
17
18
19
20
21
22
23
24
25
26
27
28
29
30
31
// user/lib/file.c
int open(const char *path, int mode)
{
int r;
// Step 1: Alloc a new 'Fd' using 'fd_alloc' in fd.c.
struct Fd *fd;
if ((r = fd_alloc(&fd)) != 0)
return r;
// Step 2: Prepare the 'fd' using 'fsipc_open' in fsipc.c.
if ((r = fsipc_open(path, mode, fd)) != 0)
return r;
// Step 3: Set 'va' to the address of the page where the 'fd''s data is cached, using
// 'fd2data'. Set 'size' and 'fileid' correctly with the value in 'fd' as a 'Filefd'.
char *va;
struct Filefd *ffd;
u_int size, fileid;
va = (char *)fd2data(fd);
ffd = (struct Filefd *)fd;
size = ffd->f_file.f_size;
fileid = ffd->f_fileid;
// Step 4: Map the file content using 'fsipc_map'.
for (int i = 0; i < size; i += PTMAP)
{
if ((r = fsipc_map(fileid, i, va + i)) < 0)
{
return r;
}
}
// Step 5: Return the number of file descriptor using 'fd2num'.
return fd2num(fd);
}

这个函数的核心在于通过 fsipc_open 获得 path 对应的文件标识符 fd 。在这之后便是通过 fsipc_map 把打开的文件内容按块映射到当前进程的用户地址空间中。

user/lib/fsipc.c 中定义了 fsipc_* 函数,大多数都是调用 fsipc 函数来与文件服务进程通信完成服务。对于 fsipc_open 函数 :

1
2
3
4
5
6
7
8
9
10
11
12
int fsipc_open(const char *path, u_int omode, struct Fd *fd) {
u_int perm;
struct Fsreq_open *req;
req = (struct Fsreq_open *)fsipcbuf;
// The path is too long.
if (strlen(path) >= MAXPATHLEN) {
return -E_BAD_PATH;
}
strcpy((char *)req->req_path, path);
req->req_omode = omode;
return fsipc(FSREQ_OPEN, req, fd, &perm);
}

这里就需要对 fsipc 函数进行一个进一步说明 :
首先在 user/include/fsreq.h 中有相关的宏定义 ,包括这个 fsipc 第一个 type 参数,还有每一个 type 对应的结构体的定义(这里只说明open相关的,其他的都差不多,不再赘述)

1
2
3
4
5
6
7
8
9
10
11
12
13
14
15
enum {
FSREQ_OPEN,
FSREQ_MAP,
FSREQ_SET_SIZE,
FSREQ_CLOSE,
FSREQ_DIRTY,
FSREQ_REMOVE,
FSREQ_SYNC,
MAX_FSREQNO,
};

struct Fsreq_open {
char req_path[MAXPATHLEN];
u_int req_omode;
};

这里面的在调用fsipc时会被用到:type用来表示请求类型,fsreq则是请求类型相对应的一个结构体,这是传递的主要内容,包括请求服务的文件的一些基本信息,在 open 中这里的信息是文件的路径以及请求打开文件的模式(只读,只写……)。

1
2
3
4
5
6
static int fsipc(u_int type, void *fsreq, void *dstva, u_int *perm) {
    u_int whom;
    // Our file system server must be the 2nd env.
    ipc_send(envs[1].env_id, type, fsreq, PTE_D);
    return ipc_recv(&whom, dstva, perm);
}

fsipc 的内部会调用 ipc_sendipc_recv 两个函数去和文件服务进程进行通信。这里 envs[1].env_id 就是文件服务进程的 env id。这里的 ipc_sendipc_recv 会通过系统调用 syscall_ipc_try_sendsyscall_ipc_recv 完成。之所以第2个进程是文件服务进程,这是在init的时候约定好的。

现在跳转到了serve 函数中(见上面),他会先通过 ipc_recv 接住来自刚才用户进程的 ipc_send 的信息,在确定没有错误之后,就会根据传进来的 type 也就是 serve 中的 req 来从选择服务向量表中对应的服务函数。再调用这个服务函数,将请求的进程的envid和请求的文件的有关信息传入函数中,交给函数进行具体处理。

1
2
3
4
5
6
7
8
9
10
11
12
13
14
15
16
17
18
19
20
21
22
23
24
25
26
27
28
29
30
31
32
33
34
35
36
37
38
39
40
41
42
43
44
void serve_open(u_int envid, struct Fsreq_open *rq)
{
struct File *f;
struct Filefd *ff;
int r;
struct Open *o;
// Find a file id.
if ((r = open_alloc(&o)) < 0)
{
ipc_send(envid, r, 0, 0);
return;
}
if ((rq->req_omode & O_CREAT) && (r = file_create(rq->req_path, &f)) < 0 &&
r != -E_FILE_EXISTS)
{
ipc_send(envid, r, 0, 0);
return;
}
// Open the file.
if ((r = file_open(rq->req_path, &f)) < 0)
{
ipc_send(envid, r, 0, 0);
return;
}
// Save the file pointer.
o->o_file = f;
// If mode include O_TRUNC, set the file size to 0
if (rq->req_omode & O_TRUNC)
{
if ((r = file_set_size(f, 0)) < 0)
{
ipc_send(envid, r, 0, 0);
return;
}
}
// Fill out the Filefd structure
ff = (struct Filefd *)o->o_ff;
ff->f_file = *f;
ff->f_fileid = o->o_fileid;
o->o_mode = rq->req_omode;
ff->f_fd.fd_omode = o->o_mode;
ff->f_fd.fd_dev_id = devfile.dev_id;
ipc_send(envid, 0, o->o_ff, PTE_D | PTE_LIBRARY);
}

他会先通过 open_alloc 分配服务端打开文件项,服务端有一个打开文件表:struct Open opentab[MAXOPEN];每个 Open 记录:
struct Open { struct File *o_file; u_int o_fileid; int o_mode; struct Filefd *o_ff; }; open_alloc() 会找一个空闲项。成功后,o 指向该项,返回的编号就是 fileid。如果用户打开模式包含 O_CREAT,服务端会调用:file_create(path, &f) 来创建文件。之后会通过函数 file_open 打开这个文件,得到这个文件的FCB,如果带 O_TRUNC,则清空文件。最后会根据得到的文件信息构造 Filefd,最后通过 IPC 把 Filefd 页返回给用户,被存储在一个 Fd 指针中。

这里需要注意的是:

1
2
3
4
5
6
7
8
9
10
11
12
13
open()
-> fsipc_open()
服务端返回 Filefd
-> fsipc_map()
服务端把文件内容块映射到用户进程

read()
-> 用户进程直接 memcpy(fd2data(fd) + offset, buf, n)

write()
-> 用户进程直接 memcpy(buf, fd2data(fd) + offset, n)
-> fsipc_dirty()
通知服务端该块变脏

也就是只有open , remove 要通过文件服务进程来实现,对于文件的写,读直接在用户进程就可以实现,因为在 fd 中保存了文件的内容。

再次总结一下这个流程:
用户进程调用文件服务函数 open -> 在用户态中通过函数 fsipc 具体实现 -> fsipc 通过 ipc 进程通讯向文件服务进程发送一个请求 -> 文件服务系统中的 serve 函数接收到请求,通过服务表分发给具体 serve_open 函数处理 -> serve_open 函数中会调用 fs/fs.c 中的函数处理这个请求,再调用 ipc_send 将处理的结果返回给用户进程 -> 用户进程接收到文件服务进程处理的结果,实现再用户进程对文件的管理。

这样我们就是实现了对于一个在用户态使用进程通信实现对于文件的处理了。

  • Title: OS Lab5流程
  • Author: Connor
  • Created at : 2026-05-26 16:35:22
  • Updated at : 2026-05-26 16:44:12
  • Link: https://redefine.ohevan.com/2026/05/26/os-lab5/
  • License: This work is licensed under CC BY-NC-SA 4.0.